Inexpensive Strobe
 So
you don't want to spend $250.00 on a strobe light for your PPC? Here's
an alternative for about $25.00. So
you don't want to spend $250.00 on a strobe light for your PPC? Here's
an alternative for about $25.00.
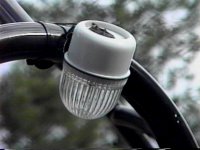
JC Whitney, the well known auto parts and accessories catalog offers several low cost strobe lights suitable for use on a PPC. The one I chose is part # 81YN1841Y. This unit is similar to the "Brightstar" unit advertised in many ultralight magazines and catalogs. The main differences are price ($19.96 vs $49.95) and number of xenon tubes. Since this unit has only one tube it is not quite as bright (100,000 cp.), but for low traffic areas it should do the trick.
For use on a PPC you will have to make a few modifications.
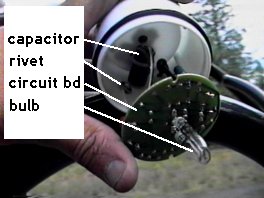
3. Safety wire the lens. Drill two small holes near the edge of the lens so you can safety wire it to the belt after installation. 4. Remove the magnet from the base and save a few grams of weight. The magnet is glued on but can be removed by carefully prying it off with a screwdriver. Fill the small hole under the magnet with silicone. 5. Wire the unit through a small switch to the supply voltage. Be sure to use a fused circuit in case of a short. I suggest a 1 to 3 amp fuse. 6. Drill a small hole in the lower most part of the lens to allow water to escape. Note: Be careful how you route your wiring. I ran mine too close to the starter handle and consequently the wire was crushed and shorted out. The fuse prevented the wire from melting. As always, if I can be of help, don't hesitate to email powerchutes@bendcable.com for help. |
 This
strobe requires a 12VDC (nominal) supply, so your machine will have to
have a battery system or power supply installed. Physical size is 2 3/4"
diameter, and 4 1/4" tall. The unit is shipped with wire and cigar lighter
plug installed, as well as a magnet glued to the base for emergency automotive
use.
This
strobe requires a 12VDC (nominal) supply, so your machine will have to
have a battery system or power supply installed. Physical size is 2 3/4"
diameter, and 4 1/4" tall. The unit is shipped with wire and cigar lighter
plug installed, as well as a magnet glued to the base for emergency automotive
use.
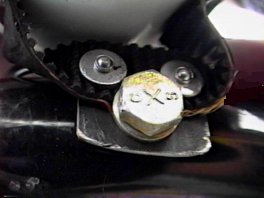 2.
Mounting hardware. The best mount will be strong, yet not transmit engine
vibrations into the unit. I used a piece of fiberglass reinforced vacuum
cleaner belt that I had laying around the house. The belt is flat, toothed,
and about 3/8" wide. You can pick up a similar belt at a vacuum cleaner
shop for a buck or two. Attach the belt to the case of the strobe with
pop rivets. Be sure to use washers on the inside of the case to prevent
the plastic from being cracked by the rivets. Then rivet belt to a metal
tab to be mounted to the upper fan guard bolt.
2.
Mounting hardware. The best mount will be strong, yet not transmit engine
vibrations into the unit. I used a piece of fiberglass reinforced vacuum
cleaner belt that I had laying around the house. The belt is flat, toothed,
and about 3/8" wide. You can pick up a similar belt at a vacuum cleaner
shop for a buck or two. Attach the belt to the case of the strobe with
pop rivets. Be sure to use washers on the inside of the case to prevent
the plastic from being cracked by the rivets. Then rivet belt to a metal
tab to be mounted to the upper fan guard bolt.