A fuel gauge for your PPC
 You've
been flying for two hours and the wind has picked up. You're still 10 miles
down wind of the airport. The GPS shows a ground speed of 11 mph. Should
you begin looking for a pasture with friendly cows? You've
been flying for two hours and the wind has picked up. You're still 10 miles
down wind of the airport. The GPS shows a ground speed of 11 mph. Should
you begin looking for a pasture with friendly cows?
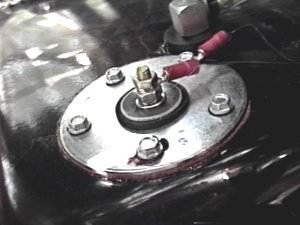
On some PPCs it's impossible to see the fuel level while flying. That little clear tube is tucked back behind the passenger seat. There must be a better way.. Installing an electric fuel gauge need not be difficult or expensive. If you already have an EIS (engine information system) from Grand Rapids Technologies, you have the gauge, but still need the sending unit. If you don't have an EIS, you can still install a fuel gauge and sender so long as you have a battery system. This article refers to my experience installing an inexpensive automotive type sending unit in an 1998 Six Chuter SR7/582. There are two basic options when it comes to sending units, the automotive float type, and the capacitance type. The capacitance type may be a little easier to install, but it is much more expensive at about $100.00, and calibration may be more time consuming. The automotive float type runs $15.00 to $20.00 at the local auto parts store, and does the job well. Because of the price difference and the immediate availability, I went the automotive type. The generic GM type fuel sender I bought has a 27 inch range of movement, which is enough for the SR7 fuel tank. Either the Ford type, or the GM type will work with the EIS system. The sending unit must be installed into a 1.75 inch hole in the top of the fuel tank. An inexpensive wood cutting hole saw mounted in a .25 inch drill does the job nicely, and is compact enough to fit into the space between the seat back and the engine. A net made from a wire coat hanger and some fabric will serve to catch the shavings from the hole saw. I recommend you wire the sender, and calibrate it with the EIS before installing it in the tank. Being able to move the float up and down while calibrating the EIS saves a lot of time. CAUTION, do not guess at the wiring! You must use the circuit recommended by Grand Rapids Technologies, or the maker of the gauge you install, to avoid a potentially catastrophic spark inside the fuel tank. (EIS wiring diagram here, but be sure to check with manufacturer for an updated diagram) The sending unit hole should be drilled opposite the filling hole, and as close as possible to the side of the tank, being sure to leave room for the mounting flange to seal against a flat surface. I recommend sealing the gasket with Locktite gasket eliminator #518, to avoid leaks. Use sheet metal screws to secure the sending unit in place. |